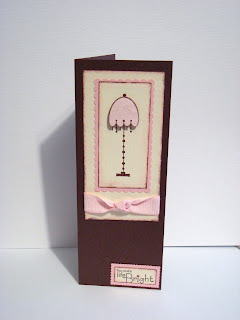
With all that time on my hands, I set right to work. I created this card with my Unity Stamps Shine On stamp set.
 To create the shadow effect under the lampshade I paper pieced the lamp. That simply means I stamped the image first onto my cardstock for the main image then stamped it a second time onto my patterned paper. I cut the lampshade on the patterned paper out and adhered it to the main image with dimensional adhesive. The image and sentiment were both mounted using my Spellbinders Long Rectangles and Long Scallop Rectangles. All the edges of the rectangle were sponged with both pink ink then brown ink before they were adhered to the scallop rectangles. The finished card size is 3" x 8".
Now this next card is just too cute! Check out what PJ made with her new Just Chillin' Slice Design Card.
 This card would be perfect with an iTunes gift card stuffed inside! Just right for any teen!
Veronica created this layout from one of her previous sketches.
 Veronica used the new Spring Quickutz Flower Border and 4x8 Aquarius font. But she didn't stop there. She cut the border twice to get the blue and the green so since she had the leftovers, she created a card!
 All she had to do was add the sentiment which was cut with the 4x8 Chick-a-Dee font. That's such a great idea...don't you think? It makes perfect sense seeing as how you've aleady got your supplies out and everything is already cut!
Tammy is still enjoying her new Hello Kitty dies. Look at this cute card she made...
 To create the embosed background, Tammy used the Sizzix Embosslits Hello Kathy and Butterfly XL Die and her Spellbinders Classic Square Large and Classic Scallop Square Large Nestabilities. The Hello Kitty dies are great for those little girls in your life!
A while back one of our readers, Yaritza, left a comment asking for a video showing how to shade the Boss Kut Lamb Peeker and here it is...
I hope this answers your questions! If you have any questions or would like to see a technique just leave us a comment and we'll get right on it. Lainey, I'm finishing up the glitter comparision for you so look for it later this week! We're so glad you stopped by today! We'll be back here Wednesday with another special guest for "With us Wednesday". If you'd like your projects to be featured email them to me at Katie@scrap-mart.com. We'd love to share them! Have a great day!
Katie


4 comments:
Hi - I thought you might have posted a card or LO of a canoe floating down the Illinois River in your backyard with all this moisture we've gotten - LOL! Thanks for ALL of the ideas and keep them coming! (-:
Thank you so much. I can't wait to try this out. He came out so cute. Now I'm going to go and buy more peekers since I won't be intimidated by them. You have been such a huge help.
Hi Shannon, it sure felt like I needed a canoe! We're still under water but at least we're not snowed in. Thanks for your comment and for stoppin' by!
Yaritza, I'm so glad it helped! Those peekers are seriously adorable! I love the layering! Can't wait to see what you do with them! Thanks! Katie
Great video Katie - I love how your lamb turned out!
Great projects today everyone!
Post a Comment