Here is an How-to for this Cute Gift bag
She has prepared a step-by-step tutorial to show us how to create this wonderful gift bag.

 To get started, this is what you'll need:
Small paper sacks (3 1/2" x 2" x 6 3/4")available at Walmart, Michael’s or Hobby Lobby.
Matching Ribbon
Small Velcro Dots
2 or 3 pieces of coordinating patterned paper
Decorative Scissors to trim down paper bag
QuicKutz Border die
Spellbinders Nestabilities Circles, Squares or Rectangles
Slice Cartridges with scalloped circles or squares
Scor-Pal
Take your small white gift bag and fold the loose part of the bottom of the bag down to meet the bottom of the bag. This will make the bottom of your bag look like a tent when turned sideways.
 This allows your bag to open flat on the bottom. Now trim the top of your bag with decorative scissors so that the bag is 4 3/4" tall.
Cut a strip of Cardstock 3 5/8" x 12". This will serve as your base to make your bag stand up. You can make it out of cardstock or a double-sided patterned paper, both work great.
Create the back piece to your bag by cutting your strip 3 5/8" x 6 1/2".
Then score your bag with the Scor-Pal at the 5" mark and fold.
At the fold line punch a small hole 1/2" in from each side.
This will allow you to attach a ribbon handle to your bag.
Run ribbon handle through holes and glue the ends to the back before you adhere the paper back to your back piece. This will hide the loose ends of the ribbon.
Create the front piece to your bag by cutting your strip 3 5/8" x 5".
You can leave this part plain or jazz it up a bit with patterned paper.
Glue this piece to the front of your bag making sure the bottom is lined up evenly.
Add your scalloped border to the front flap of your bag and decorate the front flap as you like. When you are finished, add a small Velcro dot under the flap to keep the gift bag closed.
 As you can see, these bags would be great for any occasion! Thank you PJ for sharing this with us. I can't wait to try it!
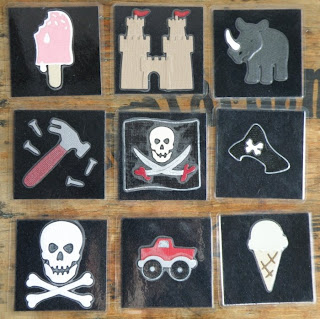
You may remember playing the Memory Card Game when you were younger or you may even play it now with your own children. Veronica has taken this game to a whole new level by creating her own set of play cards for her kids.
 She used a variety of Boss Kut and Quickutz dies, cut the shapes and mounted them onto black cardstock. Then she added a patterned paper to the reverse side.
 Once she had all her cards completed (2 of each shape) she laminated them so they could be used again and again! What a fabulous idea! You could even make cards with sight words, numbers, colors and more!


1 comment:
PJ your bag is way cute! I can see many applications for this and I love Veronica's memory game - what a great way to get some mileage out of your die collection!
Post a Comment