It's time for Scrap-Mart to begin the search for our 2010 Design Team!!! This is bittersweet for us because finding a new team means saying goodbye to our FIRST team. Veronica, Tammy and Jenn have done an outstanding job and we are thankful to have had them represent Scrap-Mart with their creative spirit.
We are looking for FIVE new Design Team members to work alongside me in the year 2010 to bring our customers and readers a whole new level of inspiration! With the holidays upon us we want to make it as easy as possible for you to apply for the DT so here's what you need to do:
Send me an email with 2010 SMDT Search in the subject line. In that email we need the following information:
- Name
- Address
- Phone number
- email (if different)
- personal blog
- and a list of any forums you hang out on (ie Paperee, Splitcoast, Two Peas etc) and please be sure to give us your forum names for each
- we also want to see your favorite card and your favorite layout that you created this year; it's OK if they've been posted elsewhere!!! They do NOT have to be made just for your DT entry, however, if you would like to make something extra special we welcome that too!
- take a moment to tell us a little about yourself; your favorite tool, are you a stamper or a scrapper or both, etc.
The Deets:
Our DT will be responsible for a minimum of 3 projects per month which could include projects, layouts, cards, tutorials and more. Each will be assigned to you in advance so you know what your goals for the month are. You may also be asked to send in physical projects for our convention booth samples. At Scrap-Mart, we believe that papercrafting should be fun and if it's not fun, let's not do it! So, with that our goal is to bring outstanding customer service and top notch inspiration to our customers while having as much fun as possible!
Our product line is diverse and we are looking for that in our DT as well. We carry some of the most popular lines such as Spellbinders, Slice, Copics, Unity Stamps and more! We are looking for a power-packed team of stampers, scrappers, die cutters and general papercrafters!
You do not have to have served on a previous design team or be an avid blogger! ANYONE is welcome to apply! Please note that we reserve the right to share your DT submissions on our blog even if you are not chosen for the DT. Make sure if you are sending projects to us that they are projects we can share! Also, we will accept International submissions.
As for compensation, each member will receive a select amount of free product every month to use to complete their assignments. Monthly product will vary in cost and by manufacturer and will be assigned by me. In addition, each member will be able to shop as much as they like at a great discount!
The DEADLINE for entries is midnight December 15th CST. After we have all entries we will put our heads together and choose the new crew! The 2010 SMDT members will be notified by December 30st and will be announced on the blog Friday, January 1st!
Okay, so that's it! What are you waiting for? Send in your information and your projects! If you have any questions please feel free to email me! And don't forget to tell your friends!!!
Katie
Monday, November 30, 2009
Friday, November 27, 2009
By the time you read this...
you have probably all returned home with loads of Black Friday goodies! I hope you all had a safe, fun and fullfilling shopping day!
Some of you may have noticed we now have the Xyron Creatopia in stock! This is truly one machine that can do it all! The Creatopia can cut, emboss, apply adhesive and more! Here are a few short videos from the Xyron studio that show you a bit of what this machine can do.
This video shows you how the Border Patternz work:
This video shows you how the use the Refillz (adhesive/laminate) works:
This video shows you how the Shapez component works. This may be the most exciting because this is the die cutting component that makes this machine compatible with most of the dies available in the industry!
This is just a preview of what this machine can do. If you have any questions regarding the Creatopia leave us a comment or email me at katie@scrap-mart.com and we'll find the answer for you!
Thursday, November 26, 2009
Happy Thanksgiving!
Scrap-Mart would like say Happy Thanksgiving, from our family to yours! We want to thank you all for your continued support! We are truly grateful for each and every one of you!
 May your turkey pe plump and juicy...and happy! hehehe
HAPPY THANKSGIVING!
 May your turkey pe plump and juicy...and happy! hehehe
HAPPY THANKSGIVING!
Wednesday, November 25, 2009
Only one day left...
'til Thanksgiving! At the last minute my hubby decided we WOULD cook so off I went to the grocery store last night. Now, my mind is in overdrive thinking of all I need to get ready for tomorrow. How 'bout you? Are you ready? Who's cooking? Who's not? Whatever your plans we hope you have a fabulous day!
Tammy has already put her Letterpress to work. Using the Holiday Printing Plate set Tammy created her family's Christmas card.
 You could make these as the card front or take it one step further and put magnet on the back and slip it inside the card. Then, after your family receives it they can just stick it right on the fridge! Tammy is lovin' her Letterpress and has already ordered more accessories so I'm sure she'll have more goodies for us very soon!
I taught a Christmas card class last week. That's always my favorite class to teach because it puts me in the holiday mood. Now, I have my Christmas cards DONE and after I get through this weekend I'll start mailing them. Yeah! Here's one of the cards I taught...
 I used Unity's Joy and Wonder stamp set for the tree and the sentiment. The label was one that came in the Santa's Workshop Gift Set. Inspiration for this card came from a sketch from Valerie Salmon's Got Sketch? blog.
We'll have a short and sweet holiday post tomorrow then we'll be back Friday with a new product preview. I am skipping the sketch this week so everyone can have time to SHOP and spend time with their family!!! Then on Monday, we'll be back with a SPECIAL ANNOUNCEMENT that you won't want to miss!!! See you then!
Katie
Monday, November 23, 2009
Are you guys ready for...
Thanksgiving? I can hardly believe that it is already that time! Thanksgiving was always my favorite holiday as a kid. I would spend the day in the kitchen helping my dad cook and my job was always the cornbread dressing. Yum! What's your favorite part of Thanksgiving?
The Letterpress has arrived in stock and our friend PJ has sent some photos for me to share with you. Here's a picture of the box for the Combo Kit...
 This picture shows the templates as you will see them when you put them on the grid...
 After you place and ink your templates then you put your cardstock down and close it up. This is what you should see...
 Once you have it placed, inked and closed it, you run it through your Epic and when you open it you will see this...
 PJ noted that her favorite part is you can do two cards at one time. Take a look at the completed cards...
 These two cards were made using the black paint that comes with the combo kit.
 For these two cards, PJ used a red ink pad instead of the paint. Notice how it gives a softer look? So pretty! Tammy has received her Letterpress and working on some more projects I can share with you.
The new November Sizzix release has also arrived. It is the Build-a-Bear dies! They are soooo stinkin' cute! I bought a stack for myself and couldn't wait to play with them. My son has a good friend who's birthday is coming up so I knew just what I would use to make her card!
 I used the Girl Bear and the Bearthday Impressions set. With the newer Sizzix dies, the extra pieces like the hat and present are separate from the bear so you have more options for layering or moving them around or not using them at all! After I had all my pieces in place I went over the hat and the embossed words with my clear Copic Spica Glitter pen to mimic the shimmer from the patterned paper. The finished size of the card is 5x5. (Note: you can click on the photo to enlarge it for detail)
Thanks for stoppin' by today! If you have any questions about the Letterpress leave us a comment or email it to me and I will get with PJ and Tammy to get you an answer. We will have our regular posts this week with some fun added in for good measure. And be sure you stay tuned because I have a special announcement coming very soon! Have a great Monday and we'll see you right back here soon!
Katie
The Letterpress has arrived in stock and our friend PJ has sent some photos for me to share with you. Here's a picture of the box for the Combo Kit...
 This picture shows the templates as you will see them when you put them on the grid...
 After you place and ink your templates then you put your cardstock down and close it up. This is what you should see...
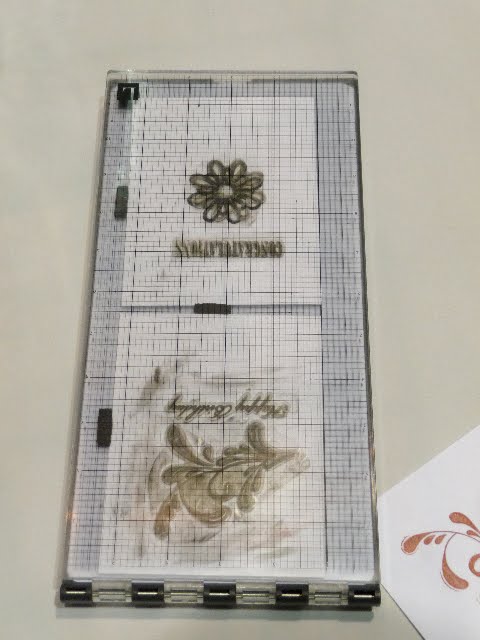 Once you have it placed, inked and closed it, you run it through your Epic and when you open it you will see this...
 PJ noted that her favorite part is you can do two cards at one time. Take a look at the completed cards...
 These two cards were made using the black paint that comes with the combo kit.
  For these two cards, PJ used a red ink pad instead of the paint. Notice how it gives a softer look? So pretty! Tammy has received her Letterpress and working on some more projects I can share with you.
 The new November Sizzix release has also arrived. It is the Build-a-Bear dies! They are soooo stinkin' cute! I bought a stack for myself and couldn't wait to play with them. My son has a good friend who's birthday is coming up so I knew just what I would use to make her card!
 I used the Girl Bear and the Bearthday Impressions set. With the newer Sizzix dies, the extra pieces like the hat and present are separate from the bear so you have more options for layering or moving them around or not using them at all! After I had all my pieces in place I went over the hat and the embossed words with my clear Copic Spica Glitter pen to mimic the shimmer from the patterned paper. The finished size of the card is 5x5. (Note: you can click on the photo to enlarge it for detail)
Thanks for stoppin' by today! If you have any questions about the Letterpress leave us a comment or email it to me and I will get with PJ and Tammy to get you an answer. We will have our regular posts this week with some fun added in for good measure. And be sure you stay tuned because I have a special announcement coming very soon! Have a great Monday and we'll see you right back here soon!
Katie
Friday, November 20, 2009
It's a chilly Friday morning...
here in the Tulsa area. I bought a new coffee pot last night...one with a timer so by the time I got out of bed this morning by coffee was done brewing. Love it! So, how was your week? Good, I hope.
Let's take a look at last week's sketch...
 This sketch was found on Scrapbooks Etc.
Jannie had a scrappin' extravaganza this last weekend. She completed 20 pages and scrapped 75 photos! That's amazing! Here's Jannie's take on last week's sketch.
 Jannie chose just a few of the elements from the sketch she liked and worked those into her layout. She used the font from Santa's Workshop for her title. Such a cute photo!
Shar also got in on last week's sketch. Check out her layout...
 Shar used the sketch to scrap her daughter's 14th birthday. She used the number candles, Quickutz Nesting Stars, and the QK Club Arrow die. I love all the Dymo Label journaling.
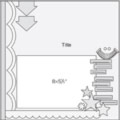
This week's sketch also comes to us from Scrapbooks Etc.
 This sketch has lots of elements to it!
Our friend Michelle Granger played along with us again this week! Here's Michelle's take on the sketch...
 Michelle started with some delicious Pink Paislee papers and stickers she found in our booth! Then she took some American Crafts chipboard and heat embossed it with American Crafts embossing powder! Michelle used the pocket element of the sketch to hold her journaling cards. She used Copic Glitter Pens for her journaling.
And here's my take on this week's sketch...
 I too used some Pink Paislee goodies on my layout. I grabbed some papers, rubons, brads and canvas tags from their Mistletoe and Co. collection earlier this week when I was visiting the store. Like Michelle, I chose to keep the pocket element on my page. I used the Spellbinders Polka Dot Frame to create my pocket. I cut one of the tags from the Pink Paislee paper and tucked it behind the opening in the frame the added a few rubons around it. This pocket is being used to house more photos from our Christmas celebration. I couldn't resist adding one of those glittery brads to the top of the tree on my canvas tag. The tag behind my chipboard title was also cut from one of the tags from the paper. After I cut it I lightly sanded the edges before adding the title. To finish off the layout I sprinkled some Kaiser half pearls around the page. I really had fun with this sketch!
Before I leave you today I wanted to show you some storage ideas from Jenn. The Quickutz Library Storage Binders are back in stock. If you're like me you have tons of 4x4 dies that need a home. Jenn has found a great solution for her dies. When she purchases a 4x4 die she keeps the insert with the picture on it. She punches a hole in the upper left-hand corner and adds it to a binder ring. She organizes these rings by groups like animals, food, etc. so she knows just where to look.
 Then she puts the dies in the Library Storage Binders and labels them with the groups that coordinate with the cards. Then, she tucks them into the drawers of her JetMax cubes she bought at Target. Jenn has also found that these drawers also work well for housing her Sizzix dies...
 This is a great way to stay organized and save on space! Thanks for sharing Jenn!
Do you have any great storage solutions? If so, we'd love to see them! You can email them to me at katie@scrap-mart.com.
Thanks for stoppin' by today! I can't wait to see what you all do with this week's sketch! Have a wonderful weekend and we'll see you back here Monday with some more fun projects!
Katie
Let's take a look at last week's sketch...
 This sketch was found on Scrapbooks Etc.
Jannie had a scrappin' extravaganza this last weekend. She completed 20 pages and scrapped 75 photos! That's amazing! Here's Jannie's take on last week's sketch.
 Jannie chose just a few of the elements from the sketch she liked and worked those into her layout. She used the font from Santa's Workshop for her title. Such a cute photo!
Shar also got in on last week's sketch. Check out her layout...
 Shar used the sketch to scrap her daughter's 14th birthday. She used the number candles, Quickutz Nesting Stars, and the QK Club Arrow die. I love all the Dymo Label journaling.
 This week's sketch also comes to us from Scrapbooks Etc.
 This sketch has lots of elements to it!
 Our friend Michelle Granger played along with us again this week! Here's Michelle's take on the sketch...
 Michelle started with some delicious Pink Paislee papers and stickers she found in our booth! Then she took some American Crafts chipboard and heat embossed it with American Crafts embossing powder! Michelle used the pocket element of the sketch to hold her journaling cards. She used Copic Glitter Pens for her journaling.
 And here's my take on this week's sketch...
 I too used some Pink Paislee goodies on my layout. I grabbed some papers, rubons, brads and canvas tags from their Mistletoe and Co. collection earlier this week when I was visiting the store. Like Michelle, I chose to keep the pocket element on my page. I used the Spellbinders Polka Dot Frame to create my pocket. I cut one of the tags from the Pink Paislee paper and tucked it behind the opening in the frame the added a few rubons around it. This pocket is being used to house more photos from our Christmas celebration. I couldn't resist adding one of those glittery brads to the top of the tree on my canvas tag. The tag behind my chipboard title was also cut from one of the tags from the paper. After I cut it I lightly sanded the edges before adding the title. To finish off the layout I sprinkled some Kaiser half pearls around the page. I really had fun with this sketch!
Before I leave you today I wanted to show you some storage ideas from Jenn. The Quickutz Library Storage Binders are back in stock. If you're like me you have tons of 4x4 dies that need a home. Jenn has found a great solution for her dies. When she purchases a 4x4 die she keeps the insert with the picture on it. She punches a hole in the upper left-hand corner and adds it to a binder ring. She organizes these rings by groups like animals, food, etc. so she knows just where to look.
 Then she puts the dies in the Library Storage Binders and labels them with the groups that coordinate with the cards. Then, she tucks them into the drawers of her JetMax cubes she bought at Target. Jenn has also found that these drawers also work well for housing her Sizzix dies...
 This is a great way to stay organized and save on space! Thanks for sharing Jenn!
Do you have any great storage solutions? If so, we'd love to see them! You can email them to me at katie@scrap-mart.com.
Thanks for stoppin' by today! I can't wait to see what you all do with this week's sketch! Have a wonderful weekend and we'll see you back here Monday with some more fun projects!
Katie
Wednesday, November 18, 2009
I bet you guys were wondering....
where the blog was this morning. Well, the bloggER slept in and as she was crawling out of bed she was informed her coffee pot broke while she was away the night before!!! GASP! So, she had to go to town for a large banana and chocolate infused cup of Joe before she could get movin'. My apologies!
So, now that I'm caffeinated how 'bout some projects?! Our friend Michelle Granger, who most of you know as the amazing instructor for Quick Quotes, sent me this adorable little holiday mini book project she made.
 Michelle is using this book to categorize her family's Christmas wishes this holiday season. She used the holiday gift set for the 'Christmas', the retired Chopsticks alpha for 'lists' and this year's Santa's Workshop font for the year. This is a great way to knock out two birds with one stone, so to speak. You can use a book like this to keep track of your holiday events, lists, etc. then after the holiday you simply add your photos to the book and you have a complete album! Love it!
Mary Sinfield and her friend Kim created this adorable book for Howard and Laura. Mary and Kim are long-time friends of Scrap-Mart. Here's a peek at the cover...
 I love how she added the gems to the snowflake! And this photo shows the little tag they added to the inside...
 Look at how they embossed the top with the Snowflake Embossing Folder. Too cute! And here's a look at one of the page spreads (please excuse the blurriness; not sure what my problem was! LOL!)...
 This book is nice and sturdy and has plenty of room for all of Howard and Laura's holiday pics!
Well, my apologies again for being late today but a girl's gotta have her coffee; or this girl does anyway! I hope you're all having a great week! It's rather chilly here in Northeastern Oklahoma which really helps to put me into the holiday spirit! If you're working on any wonderful holiday projects we'd love to see them! You can email them to me at katie@scrap-mart.com. We always love to see what our friends are up to! Don't forget to stop back by Friday for our weekly sketch challenge. See you then!
Katie
So, now that I'm caffeinated how 'bout some projects?! Our friend Michelle Granger, who most of you know as the amazing instructor for Quick Quotes, sent me this adorable little holiday mini book project she made.
 Michelle is using this book to categorize her family's Christmas wishes this holiday season. She used the holiday gift set for the 'Christmas', the retired Chopsticks alpha for 'lists' and this year's Santa's Workshop font for the year. This is a great way to knock out two birds with one stone, so to speak. You can use a book like this to keep track of your holiday events, lists, etc. then after the holiday you simply add your photos to the book and you have a complete album! Love it!
Mary Sinfield and her friend Kim created this adorable book for Howard and Laura. Mary and Kim are long-time friends of Scrap-Mart. Here's a peek at the cover...
 I love how she added the gems to the snowflake! And this photo shows the little tag they added to the inside...
 Look at how they embossed the top with the Snowflake Embossing Folder. Too cute! And here's a look at one of the page spreads (please excuse the blurriness; not sure what my problem was! LOL!)...
 This book is nice and sturdy and has plenty of room for all of Howard and Laura's holiday pics!
 Well, my apologies again for being late today but a girl's gotta have her coffee; or this girl does anyway! I hope you're all having a great week! It's rather chilly here in Northeastern Oklahoma which really helps to put me into the holiday spirit! If you're working on any wonderful holiday projects we'd love to see them! You can email them to me at katie@scrap-mart.com. We always love to see what our friends are up to! Don't forget to stop back by Friday for our weekly sketch challenge. See you then!
Katie
Monday, November 16, 2009
What a productive weekend!
It seems that everyone I've talked with has had a productive weekend. From house cleaning to card making everyone's been busy.
The lovely Maren Benedict joined the Unity blog hop over the weekend showcasing the Unity Store KOTM. I called Scrap-Mart last week to ask them to send me one of these kits and you know what they told me? The shipment arrived that morning and ALL of them went out with orders that afternoon! But, have no fear for a second shipment is on it's way! You girls LOVE your Unity! Check out Maren's adorable card...
 Aren't those owls cute? Tammy should have her kit soon too so I'll have more fun KOTM stuff to share with you.
Shar was also able to steal some scrappy time this weekend. She created this birthday gift card holder with her Santa's Workshop Gift Set.
 Shar used the Wintergreen album cover and spine for her card base. Then for the inside...
 she added the page insert and used the Summer of Fun Chicken Noodle font for the 'happy birthday'. Then, Shar added a row of 2x2 presents. To hold the gift card...
 Shar added in the folder insert page. She tied it all together with a ribbon and viol`a! These would even be great to use to hold scratch off lottery tickets for stocking stuffers! Ohh, my hubby would love that!
Now look at this beautiful, elegant Christmas card from Eva...
 She added the tags to the Spellbinders Fancy Tags and the sentiment to the Spellbinders Labels Two Nestabilities. Such a pretty card! I love all the subtle details!
I spent my time at my Scrap Pink crop Saturday preparing for a class I'm teaching tomorrow. I got 9 of the 12 cards designed and kitted plus a two-page 12x12 layout. Not bad seeing as how I really didn't start working 'til around 1:30 in the afternoon. LOL! Here's one of the cards I created...
 I started by stamping the poinsetta from the Unity Hodge Podge of Happiness kit twice; once in red and once in green. Then I trimmed sections from the red so you could see the green leaves when they were layered. I used the new Copic Spica Glitter pens to add some bling to the center of my flower then centered the poinsetta on a layered set of Spellbinders Labels Three Nestabilities. This, I think, is my favorite card of the set.
Well, did you have a productive weekend? We'd love to hear what you got done...even if it's not scrappy! I have a fun project to share Wednesday from our friend Michelle Granger so be sure to stop by! Have a great week and we'll see you then!
Katie
The lovely Maren Benedict joined the Unity blog hop over the weekend showcasing the Unity Store KOTM. I called Scrap-Mart last week to ask them to send me one of these kits and you know what they told me? The shipment arrived that morning and ALL of them went out with orders that afternoon! But, have no fear for a second shipment is on it's way! You girls LOVE your Unity! Check out Maren's adorable card...
 Aren't those owls cute? Tammy should have her kit soon too so I'll have more fun KOTM stuff to share with you.
Shar was also able to steal some scrappy time this weekend. She created this birthday gift card holder with her Santa's Workshop Gift Set.
 Shar used the Wintergreen album cover and spine for her card base. Then for the inside...
 she added the page insert and used the Summer of Fun Chicken Noodle font for the 'happy birthday'. Then, Shar added a row of 2x2 presents. To hold the gift card...
 Shar added in the folder insert page. She tied it all together with a ribbon and viol`a! These would even be great to use to hold scratch off lottery tickets for stocking stuffers! Ohh, my hubby would love that!
 Now look at this beautiful, elegant Christmas card from Eva...
 She added the tags to the Spellbinders Fancy Tags and the sentiment to the Spellbinders Labels Two Nestabilities. Such a pretty card! I love all the subtle details!
I spent my time at my Scrap Pink crop Saturday preparing for a class I'm teaching tomorrow. I got 9 of the 12 cards designed and kitted plus a two-page 12x12 layout. Not bad seeing as how I really didn't start working 'til around 1:30 in the afternoon. LOL! Here's one of the cards I created...
 I started by stamping the poinsetta from the Unity Hodge Podge of Happiness kit twice; once in red and once in green. Then I trimmed sections from the red so you could see the green leaves when they were layered. I used the new Copic Spica Glitter pens to add some bling to the center of my flower then centered the poinsetta on a layered set of Spellbinders Labels Three Nestabilities. This, I think, is my favorite card of the set.
 Well, did you have a productive weekend? We'd love to hear what you got done...even if it's not scrappy! I have a fun project to share Wednesday from our friend Michelle Granger so be sure to stop by! Have a great week and we'll see you then!
Katie
Friday, November 13, 2009
I can't believe it's already Friday!
This week has flown by! Tomorrow I'm attending a Scrap Pink benefit crop and I'm hoping to get lots done! My aunt asked for a set of cards for Christmas and Seth wanted me to make something for his teacher. I have to admit, I'm usually a procrastinator so this year, I'm going to get ahead of the hustle and bustle of the holidays! I have Mrs. Dill's notecards 1/2 done and will hopefully get my aunt's done this weekend. How 'bout you? Are you giving any homemade gifts this year?
Last week's sketch was brought to us by Scrapbooks Etc.
 This sketch is a two-page 8 1/2 x 11 layout but it's easily alterable.
Our friend Jannie used the sketch to create a one page 12x12 layout.
 Jannie used the Revolution heart and the Enjoy font. I love the straight lines and simplicity! Thanks for joining us this week!
This week's sketch is another one from Scrapbook's Etc.

Michelle Granger joined us again this week. Check out her layout...
 She used the Quickutz 4x8 Aquarius alphabet for her title and mixed if with tiny alpha stickers. Then, Michelle used the Spellbinders Deckled Rectangles to cut out her photos. Here's a closeup view so you can see the detail around the edge of the pics and the title...
 It's those little details that really bring a layout together!
Our friend Eva has also joined us this week with the sketch challenge.
 Eva used a collection of Unity Stamps to bring her layout together. Isn't it beautiful? There's lots of detail in her layout. Did you notice the stitching?
I used the inspiration found in this sketch to get started on my mother's Christmas present. I have the layout done so after the pics are printed all I have to do is drop them in and embellish! Love it!
 I started with a Quick Quotes 12x12 canvas panel, My Michelle papers and a vellum quote. Then I used my Santa's Workshop set to create a mini album right on the canvas. I mixed pages from the Wintergreen and Sugarplum sets and added the scallop spine.

 I'm going to add one large picture above the mini book then I'll fill the book with more pics!
Thanks so much for stoppin' by today! And thanks to all of our guests who shared projects with us this week! My 9 year old just reminded me that today is Friday the 13th! Oooohhhhhh! Hopefully you all have a great Friday in spite of that. LOL! Enjoy your weekend and we'll see you right back here Monday!
Katie
Last week's sketch was brought to us by Scrapbooks Etc.
 This sketch is a two-page 8 1/2 x 11 layout but it's easily alterable.
Our friend Jannie used the sketch to create a one page 12x12 layout.
 Jannie used the Revolution heart and the Enjoy font. I love the straight lines and simplicity! Thanks for joining us this week!
This week's sketch is another one from Scrapbook's Etc.

Michelle Granger joined us again this week. Check out her layout...
 She used the Quickutz 4x8 Aquarius alphabet for her title and mixed if with tiny alpha stickers. Then, Michelle used the Spellbinders Deckled Rectangles to cut out her photos. Here's a closeup view so you can see the detail around the edge of the pics and the title...
 It's those little details that really bring a layout together!
 Our friend Eva has also joined us this week with the sketch challenge.
 Eva used a collection of Unity Stamps to bring her layout together. Isn't it beautiful? There's lots of detail in her layout. Did you notice the stitching?
 I used the inspiration found in this sketch to get started on my mother's Christmas present. I have the layout done so after the pics are printed all I have to do is drop them in and embellish! Love it!
 I started with a Quick Quotes 12x12 canvas panel, My Michelle papers and a vellum quote. Then I used my Santa's Workshop set to create a mini album right on the canvas. I mixed pages from the Wintergreen and Sugarplum sets and added the scallop spine.
 I'm going to add one large picture above the mini book then I'll fill the book with more pics!
 Thanks so much for stoppin' by today! And thanks to all of our guests who shared projects with us this week! My 9 year old just reminded me that today is Friday the 13th! Oooohhhhhh! Hopefully you all have a great Friday in spite of that. LOL! Enjoy your weekend and we'll see you right back here Monday!
Katie
Wednesday, November 11, 2009
Before I get to anything...
scrappy, I want to take a moment to recognize our nation's veterans. Today is, of course, Veteran's Day. Many in our lives have gone before us and served, sacrificed and protected to give us the great freedoms we all experience today. If not for them, can you imagine where we'd be today? According the the US Department of Veteran's Affairs "The original concept for the celebration was for a day observed with parades and public meetings and a brief suspension of business beginning at 11:00 a.m." Although many business do not close anymore, the day is still observed and honored with parades, meetings and special events. So, I'd like to send out a huge thanks to our Veteran's (and those still serving today) and their families for their service to our country.
I don't know about you but I love to surf blogs. That is, afterall, where I find TONS of inspiration! I have seen much of the talented Maren Benedict's work before. I was redirected to her blog again last night and could hardly believe my eyes! I saw the cutest project! Wanna see?
 See, I told you! Is that not the cutest darn turkey you've ever seen?! Maren used Unity's Build a Turkey stamp set to make this little guy. She has decided to make these as the place cards for their Thanksgiving meal! How fun! Thank you Maren for sharing this adorable turkey with us! Be sure to add Maren's blog to your favs. I promise she will not disappoint!
While I was perusing Maren's blog last night another one of her projects inspired me to break out my Unity stamps.
 I used Unity's Simple Blessings stamp set and arranged the leaves on the acrylic block and stamped them all at once. Then, before I added my papers I used my Scor-Pal and Scor-Bug embosser to add the line of piercing (directly above the line of leaves; click on the photo to enlarge for details). After adding the paper and ribbon, I stamped my sentiment then cut it out using Spellbinders Labels Three. The label was trimmed to remove the excess and allow it to line up flush with the patterned paper. While this card has a fall theme to it, you could easily give it as a simple thank you card for any occasion!
Jenn's creativity is still in overdrive and she just can't get enough of Santa's Workshop! Check out this great gift idea she came up with...
 Jenn used the Wintergreen album cover and added the Sugarplum Spine to make the book thicker. She decorated the front cover with the Sizzix paper doll wearing the doctor outfit. For the inside,
 Jenn simply used a repositionable adhesive to adhere a packet of soup! How clever! Again here you have a project that you could easily alter for any occastion!
I am thankful for ALL of our crafty friends and their willingness to share their creativity to inspire others! Thanks to all of you for stoppin' by today! While you're here, please take a moment to give our guest, Maren a little love! We'll be back on Friday for our Friday Sketches! I sure hope you can join us! See you then!
Katie
I don't know about you but I love to surf blogs. That is, afterall, where I find TONS of inspiration! I have seen much of the talented Maren Benedict's work before. I was redirected to her blog again last night and could hardly believe my eyes! I saw the cutest project! Wanna see?
See, I told you! Is that not the cutest darn turkey you've ever seen?! Maren used Unity's Build a Turkey stamp set to make this little guy. She has decided to make these as the place cards for their Thanksgiving meal! How fun! Thank you Maren for sharing this adorable turkey with us! Be sure to add Maren's blog to your favs. I promise she will not disappoint!While I was perusing Maren's blog last night another one of her projects inspired me to break out my Unity stamps.
 I used Unity's Simple Blessings stamp set and arranged the leaves on the acrylic block and stamped them all at once. Then, before I added my papers I used my Scor-Pal and Scor-Bug embosser to add the line of piercing (directly above the line of leaves; click on the photo to enlarge for details). After adding the paper and ribbon, I stamped my sentiment then cut it out using Spellbinders Labels Three. The label was trimmed to remove the excess and allow it to line up flush with the patterned paper. While this card has a fall theme to it, you could easily give it as a simple thank you card for any occasion!
Jenn's creativity is still in overdrive and she just can't get enough of Santa's Workshop! Check out this great gift idea she came up with...
 Jenn used the Wintergreen album cover and added the Sugarplum Spine to make the book thicker. She decorated the front cover with the Sizzix paper doll wearing the doctor outfit. For the inside,
 Jenn simply used a repositionable adhesive to adhere a packet of soup! How clever! Again here you have a project that you could easily alter for any occastion!
I am thankful for ALL of our crafty friends and their willingness to share their creativity to inspire others! Thanks to all of you for stoppin' by today! While you're here, please take a moment to give our guest, Maren a little love! We'll be back on Friday for our Friday Sketches! I sure hope you can join us! See you then!
Katie
Monday, November 9, 2009
Have you noticed???
The Holiday Gift Sets are back in stock! But, I'm sure not for long! Now is your chance, if you missed it the first time, you still have time to snag one!
I received lots of happy mail this weekend. Happy mail from Eva, Jenn and Jannie. That's the best part of my job! Now, I get to share that happy mail with all of you!
Eva has accepted a Design Team position with a new division of Unity Stamps called {ippity}. You can read more about it on her blog. We'd like to congratulate Eva on her new position and thank her for sharing her beautiful projects with us! This is just ONE of the cards I receieved from Eva yesterday.
 Eva used the trees and sentiment from Unity's Joy and Wonder set, the ornament from Unity's Embellished Season. The ornament and sentiment were stamped on one of Spellbinders Labels One Nestabilities. Isn't this a beautiful card?!
Jenn created this little treat cup, one of many she will make and place around her house filled with candy for the holidays.
 Jenn used the Sizzix Bigz XL Treat Cup die to make this. What's great is she could easily replace the pumpkin with a candy cane or a snowman for Christmas! Jenn also said these are the perfect size for an extra large muffin or a gourmet cupcake! Yum! Oh, you know what? You could fill these with little treats, candy and a small toy or game, then make a nameplate, attach it to a skewer and have it stick out of the treat cup and use them for your Thanksgiving and/or Christmas nameplates!
My son Cody had a birthday party to attend this weekend so I thought I'd create the birthday a handmade card.
 All the papers I used on this card were scraps. I added the die cut tag, circle and star from the coordinating line. I used Santa's Workshop font for the sentiment. I used the Fiskars Apron Lace border punch for the green strip on the opening edge of the card. This card came together in less than 10 minutes! And, no scraps went to waste! Love it!
I hope you all had a fabulous weekend. The weather here was absolutely wonderful all weekend! We'll be back here on Wednesday with some more wonderful projects from Eva, our friend Carrie and more! Have a great Monday and we'll see you then! Thanks for droppin' by!
Katie
I received lots of happy mail this weekend. Happy mail from Eva, Jenn and Jannie. That's the best part of my job! Now, I get to share that happy mail with all of you!
Eva has accepted a Design Team position with a new division of Unity Stamps called {ippity}. You can read more about it on her blog. We'd like to congratulate Eva on her new position and thank her for sharing her beautiful projects with us! This is just ONE of the cards I receieved from Eva yesterday.
 Eva used the trees and sentiment from Unity's Joy and Wonder set, the ornament from Unity's Embellished Season. The ornament and sentiment were stamped on one of Spellbinders Labels One Nestabilities. Isn't this a beautiful card?!
Jenn created this little treat cup, one of many she will make and place around her house filled with candy for the holidays.
 Jenn used the Sizzix Bigz XL Treat Cup die to make this. What's great is she could easily replace the pumpkin with a candy cane or a snowman for Christmas! Jenn also said these are the perfect size for an extra large muffin or a gourmet cupcake! Yum! Oh, you know what? You could fill these with little treats, candy and a small toy or game, then make a nameplate, attach it to a skewer and have it stick out of the treat cup and use them for your Thanksgiving and/or Christmas nameplates!
 My son Cody had a birthday party to attend this weekend so I thought I'd create the birthday a handmade card.
 All the papers I used on this card were scraps. I added the die cut tag, circle and star from the coordinating line. I used Santa's Workshop font for the sentiment. I used the Fiskars Apron Lace border punch for the green strip on the opening edge of the card. This card came together in less than 10 minutes! And, no scraps went to waste! Love it!
I hope you all had a fabulous weekend. The weather here was absolutely wonderful all weekend! We'll be back here on Wednesday with some more wonderful projects from Eva, our friend Carrie and more! Have a great Monday and we'll see you then! Thanks for droppin' by!
Katie
Thursday, November 5, 2009
Whew! What a week!
It has been one exciting, inspiration packed week! Don't you think? And, we're not quite done! It's Friday so we have another sketch to tackle. But, before we do let's take another peek at last week's sketch.
 This sketch was found on the Page Maps site.
Our friend, Jannie, used this sketch to complete a layout for her recent trip to Long Beach.
 Jannie used the Strawberry font for her 2009 and added that to a Revolution Tab. To make the 'Long Beach' part of her title she used the Monogram dies and added thin foam dots under the letters to give them some dimension. You can see the shadow the foam dots provided. Jannie used the kraft colored cardstock because it made her think of sand. Such a great idea!
This weeks' sketch comes to us from Scrapbook's Etc.
 This sketch is actually a two-page, 8 1/2 x 11 layout BUT, check out our samples to see the versatility!
I mentioned the other day that I would have a layout from a special guest. Well, our special guest is none other than Michelle Granger. For those of you who are not familiar with Michelle, she is THE teacher for Quick Quotes! She teaches their classes at conventions all over the country and at their Private Reserves. And, she is AMAZING at what she does! So, here is Michelle's take on this week's sketch...
 Michelle started out with some new Pink Paislee Mistletoe papers and rubons. She added some Scenic Route chipboard, a Quickutz Arrow and created her circle with the large Spellbinders Circle Nestabilities. Michelle was inspired by the sketch to create a single page, 12x12 layout. Isn't it great?!
I liked the two-page aspect of the sketch but stretched mine to a two-page, 12x12 layout.
 I really liked the accessories from this week's Holiday Gift Set release and wanted to showcase them on regular projects so you could see their versatility. I cut a strip of the striped paper to 2x12 then used the Pop Up Flowers to add dimension to the end of that strip. I stamped the title using my Unity Let's Get Scrappy kit. Then I took a 1 1/2" x 1 1/2" square and cut a Pop Up Window out of it. Then I added some Robin's Nest gems to each side for knobs to open the doors. I used my Rockstar font to cut the number 5 behind the window (sorry, forgot to take a pic...blush). The paper, arrow, stickers, flower die cut and chipboard piece all came from my Scenic Route Loveland product kit. The large heart is a canvas die cut from Quick Quotes. I misted it with my Bubblegum Glimmer Mist then added the stickers to it. Then I used the Circle Mini Album and adhered it to the front of the heart and tied it closed with a piece of ribbon. I wrote the 5 things I love the most about my daughter on the circles. Here's a pic of what it looks like open...
 This layout was lots of fun to make and I like the 3-d and interactie aspect of it.
Thanks so much for visiting us all week! I have received numerous emails regarding the projects and the gift sets. We really enjoy being able to share our projects with you and we thank you all for your kind comments and for your business! After all, we wouldn't be here if it weren't for you! I wish you all a wonderful Fall weekend and we'll see you right back here Monday morning!
Katie
Subscribe to:
Posts (Atom)


