Monday, March 30, 2009

I sure hope...

your weekend was a little drier and a little warmer than mine! I ended up with 8" of snow in my front yard yesterday. Then today, temps rose into the 40's and almost all the snow is gone. Now, I have a river! LOL! The positive side was I had plenty of down time so I got lots done!

With all that time on my hands, I set right to work. I created this card with my Unity Stamps Shine On stamp set.
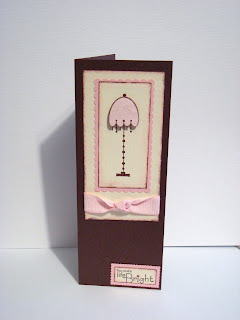
To create the shadow effect under the lampshade I paper pieced the lamp. That simply means I stamped the image first onto my cardstock for the main image then stamped it a second time onto my patterned paper. I cut the lampshade on the patterned paper out and adhered it to the main image with dimensional adhesive. The image and sentiment were both mounted using my Spellbinders Long Rectangles and Long Scallop Rectangles. All the edges of the rectangle were sponged with both pink ink then brown ink before they were adhered to the scallop rectangles. The finished card size is 3" x 8".

Now this next card is just too cute! Check out what PJ made with her new Just Chillin' Slice Design Card.

This card would be perfect with an iTunes gift card stuffed inside! Just right for any teen!

Veronica created this layout from one of her previous sketches.

Veronica used the new Spring Quickutz Flower Border and 4x8 Aquarius font. But she didn't stop there. She cut the border twice to get the blue and the green so since she had the leftovers, she created a card!

All she had to do was add the sentiment which was cut with the 4x8 Chick-a-Dee font. That's such a great idea...don't you think? It makes perfect sense seeing as how you've aleady got your supplies out and everything is already cut!

Tammy is still enjoying her new Hello Kitty dies. Look at this cute card she made...

To create the embosed background, Tammy used the Sizzix Embosslits Hello Kathy and Butterfly XL Die and her Spellbinders Classic Square Large and Classic Scallop Square Large Nestabilities. The Hello Kitty dies are great for those little girls in your life!

A while back one of our readers, Yaritza, left a comment asking for a video showing how to shade the Boss Kut Lamb Peeker and here it is...


I hope this answers your questions! If you have any questions or would like to see a technique just leave us a comment and we'll get right on it. Lainey, I'm finishing up the glitter comparision for you so look for it later this week! We're so glad you stopped by today! We'll be back here Wednesday with another special guest for "With us Wednesday". If you'd like your projects to be featured email them to me at Katie@scrap-mart.com. We'd love to share them! Have a great day!

Katie

Friday, March 27, 2009

There was only two.....

takers for this week's sketch. The first, Carrie, created both a card and a layout. Here's Carrie's take on Veronica's sketch:

Carrie has been holding onto this photo for almost a year and had no idea what she wanted to do with it. That is until she saw Veronica's sketch! She used the Quickutz Cookie Cutter Flower Border but notice behind the border! Carrie swiped down some green acrylic paint to add some color behind the border! She mixed her title up with Chemistry and Stiletto. Take a look at the close-ups:

The green paint, the mixture of small embellishments around the border and the circle of brads really bring this layout together! Carrie wanted to thank Veronica for the inspiration for this layout!

Now look at Carrie's card:

Carrie used the Quickutz Revolution Shortkutz Happy Birthday for her sentiment and while her cherry is from Creative Imaginations, you could easily use the Quickutz Doublekutz Cherry or the Quickutz 3-d Pop Up Cherry! The stitching around the cherries was a great addition of texture and added dimension!

Our second taker this week was Amanda Havon. Her card has a story behind it but before I share that, let me show you her card. She used the Quickutz Rollerskate font for her sentiment...

Amanda made this card for her husband. See, she is pregnant with their second child and she's having a tough time and is battling nausea and "morning sickness." Her husband has been very understanding and has held her hand through it all and this was a simple way she could thank him and let him know he is appreciated. Like Amanda said, "Love needs no occasion"!

We appreciate both of you playing along with our Friday sketch challenges and to thank you, you both will receive a prize! Please email me with your addresses so I can get them out to you!

Let's keep the fun going...here's this week's sketch:

This sketch comes from Scrapbook's Etc.

Jenn created her layout to document her son's first day of Kindergarten.

She used Scenic Route's Liberty patterned paper and stickers and Bosskut alphabets Licorice Stick and Cameron for her title. She stamped her checklist using Unity Stamps Checklist of Life journaling stamp. The big bracket was cut with the Silhouette and the Arrows were cut with a Quickutz 2x2 die.

Veronica also cut her bracket with her Silhouette and she decided to mat hers.

Her title, which means "A big Easter egg filled with candy" was created with the Quickutz Supermarket font and her Dymo labeler. Veronica doodled on the journal spot with a black writing pen then colored it in with her Copic marker.

Tammy combined Quickutz Chemistry and Banana Split fonts for her title.

She also used the Quickutz Heart Border and some Quickstrips.

I had to be the odd one in the bunch. Despite the sketch I didn't use a bracket. I also turned the sketch upside down. Here's my take...

My title was stamped with the Unity Stamps Check this Kid out stamp. I used my Pink Martini Quick Quotes Powderpuff Ink to stamp and to ink the edges of my patterned paper. I hand-wrote my journaling and mixed in some Unity Stamps from the Our Life, Our Stories set. A little doodling around the edge of my layout with my white gel pen and that's it!

We hope you're inspired by the sketches! The DT is sure enjoying them. If you decide to play along this week simply email me your project to Katie@scrap-mart.com by noon next Thursday. You never know when I'll decide to give a random prize for participation! Have a super weekend and we'll see you back here Monday! Thanks for stoppin' by!

Katie

Wednesday, March 25, 2009

Today's guest "With us Wednesday"....

is none other than the fabulous Layle Koncar! Layle has been scrapbooking and paper crafting for over 11 years! She's not only an amazing designer but she also teaches and is considered a trend setter in the industry. Look at this adorable card she made with the Unity Stamps Baby Journey set...

Layle used American Crafts Pastel Cardstock, Pink Paislee's Honey Bunch patterned paper from the Sweet Cakes Collection, lined paper from Scenic Route, Doodlebug Stickers, Fiskars Apron Lace Border Punch and colored pencils. The finished card size is 5x5. Here are the instructions for the card:

1. Trim cardstock to 5x10, score in half using Scor-Pal, fold to create card.
2. Cut 4.75x4.75 piece of Honey Bunch, punch border along bottom and adhere to card.
3. Outline inside of card using a fine tipped black pen.
4. Stamp baby stamp 2 times on white lined background; trim with scissors and color one dress pink and one blue with colored pencils. Adhere to Honey Bunch with pop dots for added dimension.
5. Add alphabet stickers under each dress.

Thank you, Layle, for joining us today! We hope you'll come back to visit us again soon!

Now, Tammy has transformed what once was sack into this adorable gift bag!

Tammy used the Hello Kitty with Flower Sizzlit, Hello Kitty So Sweet Sizzlit Border, and her Quickutz Nesting Flowers and Circles. This gift bag would be perfect for any girl and any occasion!

The warmth of the Sassafrass Lass papers insired Veronica to create this layout...

Veronica used the Revolution Weather shapes, the Galosh, and the 4x8 Chick-a-Dee alphabet. Here's a closeup view of the galoshes and the title...

I love the mixed font title and the layers!

I created this next card using the Making Memories Slice Wedding Design Card.

The 'friend' actually had an S on it but I cut it off to make it work. Then I heat embossed it with American Crafts Zing Glitter Embossing Powder before I adhered it to the card base. Here's a closeup so you can see the detail...

I ran the white strip of cardstock through my Cuttlebug Swiss Dots Embossing Folder. The decorative border was created using my new Fiskars Effervescence Border punch (these are in stock and will be on the site shortly!). I attached some ribbon and a Making Memories Curling Tag. Since I wanted a softer look, I used my chalks on the card edges instead of inks.

We're so glad you stopped by today! While you're here, take a moment to leave Layle a welcome comment and let us know what you liked best today! We'll be back here Friday with our reader's projects from last week's sketch and another great sketch for next week! See you then!

Katie

Tuesday, March 24, 2009

Phunk Phresh...

is what this Quickutz Release screams! Check it out...

These shapes make me think Smurfs and Rainbow Bright! LOL!

Here's a layout using the new Cloud Border and the Rainbow:

The title was made using the 4x8 Aquarius alphabet. That Cloud Border would coordinate perfectly with just about any outside photo!

And here's a card with the Cloud Border and Rollerskate alphabet:

You could whip up a batch of these in no time and have a stash of quick cards for when you need to send a bit of encouragement!

And Scrap-Mart's well known quarter-size reference:

Here you see the Revolution Birds on the left and the 2x2 Bird on the right. Jenn thinks the squared off shape of these birds make them perfect for boy projects!

This picture shows the new Nesting Stars.

The best part is that the Cookie Cutter dies now come pre-foamed! Can it get any better?

We're glad you stopped by today! Don't forget our regularly scheduled post tomorrow! Have a great day and we'll see you there!

Katie

Monday, March 23, 2009

If you are signed up to receive....

the Scrap-Mart newsletter then you know that Scrap-Mart is now carrying Sizzix! We've received numerous shipments of the new Sizzix stuff including the new Big Shot Express. Jenn has prepared a video to show you just how great this new machine is! Check it out:


How great is that?! It's so easy and super fast! Thanks Jenn for showing us how awesome the new Big Shot Express is! Now, these machines are not showing on the site yet so if you're interested in one, email me and I'll get you the info you need!

With Sizzix in hand, Jenn created this awesome layout documenting her trip to the Botanical Gardens.

Jenn used the Hello Kitty Corner Flower Sizzlit to adorn each corner of her layout. The title was cut using her Silhouette and the Postcard Portfolio. That border compliments her pictures perfectly!

Speaking of Hello Kitty, Jenn created this cute, cute card...

She used the Hello Kitty Sitting with Bow and Shoes. The background was embossed using the Sizzix Texture Plates set #19 and the sentiment is from the Quickutz Basic Phrases Cookie Cutter set. Jenn used her Cool Grey 3 Copic marker to create the shadows on Hello Kitty. This card would be perfect for any little girl's birthday!

I too have been playing with the new Hello Kitty dies. I used my Scor-Pal to create this simple 4x4" basket.

I used the Sizzlits Decorative Easter Eggs Strip to create the bottom border and the Hello Kitty with Bunny Costume as my main image. I outlined the grass and Hello Kitty were colored the eggs with my Copic markers. To create the border on the plastic egg I simply cut a strip from the Sizzlits Loops with Hearts and Bows Decorative Strip and trimmed it to fit just around the egg under the seam where it snaps together. Then I cut one of the bunnies from the Hello Kitty Bunnies and Chicks die, put a tiny bow around it's neck and adhered it to the strip. My daughter hasn't put this basket down!

Veronica used her Boss Kut dies to create this great layout!

The title, which translates to Summer Fun at the Beach, was cut with the Licorice Stick font. Veronica also used the Wave Border, the Sand Pail and the Starfish. Here's a closeup view of the Wave Border and Starfish...

Such a great layout!

Tomorrow is Quickutz release day so be sure to check back and see what's new! Also, you still have time to get your sketch projects in! You can email them to me at Katie@scrap-mart.com. Please be sure to include the list of products you used on your project! Have a great Monday and I'll see you tomorrow!

Katie

Friday, March 20, 2009

I have some really fun...

things to share with you today! Contest projects, a prize winner, NEW product and more! Let's start by sharing the contest projects. Thank you to all who participated! Here they are in no particular order:

Michelle Granger sent both a card and layout plus she posted about it on her blog.

Michelle used the new Pink Paislee Enchanting papers for both her card and layout. I really love the yellow background on them both!

Amanda Havon created this pretty card...

She used the new Fiskars Upper Crest Border Punch (you will see this and more on our site VERY SOON!)and the Swiss Dots Cuttlebug Embossing Folder. The embossed background and layers add so much detail!

Shar also made a project from both sketches as well as posted on her blog.

Shar used the Quickutz Scallop Border and the Revolution Flower for her card. The bright colors are so bright and cheery!

Marika from Sweden sent in this wonderful layout!

Marika used the Lemonade and Spicy Chicken fonts for her title. Everything just pops right off the dark background.

Carrie sent this yummy cupcake card...

Carrie used the Quickutz Nesting Flowers . The coordinating cupcake paper is just perfect for this card!

Thank you all for participating! We appreciate you and your efforts! Now, for the winner...drum roll please...Congratulations Shar! You are the winner! Shar, I already have your address so we'll get your Quickutz Vinyl right out to you!

Okay, so are you ready for another sketch? This week's card sketch comes from www.making-birthday-cards.com.

I like that this sketch is great as is but can also be turned and tweaked to meet your liking! Look what Tammy did with this sketch...

To create her card, Tammy used Classic Squares Large and the Classic Scallop Squares Large and the Unity Stamp Birthday Chic stamp set. She used American Crafts cardstock and a touch of ribbon. Anyone would love to receive this card!

Here's my take on the sketch...

After I created my card base, I inked all the edges with my Midnight Confessions Quick Quotes Powder Puff Ink. All the images on the card were cut with my Just Chillin' Slice Deisign Card. After I cut the images, I heat embossed them with American Crafts Zing Glitter Embossing Powder. I LOVE the shimmer and the look of glitter this gives without the mess! The inside of the card says "Have a rockin' birthday!". This is totally up my 12 year old's alley!

Our layout sketch this week comes from Veronica again! Check it out...

Here's Veronica's take on her own sketch!

Veronica used the Chick-a-Dee alphabet , the Sunburst Border and the Square Flowers. I love the colors in her layout!

And here's my interpretation...

I used the Quickutz Bead Border and simply scored in between the beads with my Scor-Pal and folded them accordian style. I did the same thing with my strip of cardstock on the side and when I was done, I punched holes all the way through and ran ribbon through it. When the ribbon is pulled from the right side, it reveals my hidden journaling...

The title was cut with my Hello Kitty Super Cute Sizzlits Border. This layout was alot of fun to create!

Thanks again to all who participated in the sketch contest! Stay tuned because we have some more contests coming soon! Don't forget about "With us Wednesdays". You can email me your projects to Katie@scrap-mart.com and we can share them. For you Slice owners, I have a special 'thank you' for you if you submit Slice projects for our Wednesday posts. We hope you all have a scraptastic weekend and we'll see you back here Monday. It is a post you WON'T want to miss! Until then, happy scrappin'!

Katie

Wednesday, March 18, 2009

I hope the weather...

in your neck of the woods is getting warmer. It's been gorgeous here the last few days and the forecast says we can expect more of it. That's more than I can say for what Jenn has endured. Take a look at this layout Jenn created with the new Quickutz Weather die.

While Jenn's son was playing soccer it began to rain. She took some pics and whipped out this great layout. Jenn used the Quickutz Marigold alphabet and replaced the "o" with the 2x2 soccer ball. She also used the Revolution Weather die. To add the date, she used a stamp from the Unity Stamp Let's Get Scrappy Set.

Veronica has also experienced some not-so-dry weather.

Veronica's title, which translates to "Swedish Summer?", was created using the Chick-a-Dee font. She also used the Revolution Umbrella.

This next layout comes from Tammy.

Tammy used the Quickutz Scallop Border, photo corner, and the Banana Split font. Look at that face! She's sure enjoying her blueberries! LOL!

I'm right in the middle of a project. Since I'm not quite finished with it I thought I'd show you an element I created for my page.

This little tag will serve as my title for my page when it's complete! I used my Spellbinders Petite Circle and Scallop Circle to create the tag base. The little bear is the Boss Kut Bear Peeker and I added the Boss Kut Angel Wings. The title was cut with the Boss Kut My Little Angel die. Before I layered my circles I inked the edges using my Quick Quotes Mocha Mama Powder Puff Ink.

We hope you're having a good week. Don't forget you have until noon tomorrow to email your submissions for the sketch contest to me at Katie@scrap-mart.com. I have 4 entries so far! The prize will be some Quickutz Vinyl. If you haven't seen the sketch or the contest details, you can read about them here. We'll see you back here Friday with all of the entries for the contest and a new sketch. Until then, happy Scrappin'!

Katie