First off today I'd like to share is a mini-book created by DT member Tammy.


This little book would be great as a gift for grandparents! Tammy packed this book full of die cuts. She used QK nesting circles, QK nesting flowers, QK angel, QK Christmas tree from Merry gift set, QK tree border, QK border beads, QK border dots, QK Rollerskate font. Tammy used a chipboard mini-book to create hers but you could definately make you own using the Spellbinders Nestabilities.
The second project I want to show you today is this Scor-Pal triangle ornament created by Brenda.
 These would make great personalized ornaments for your kids on the Christmas tree! To make one of these follow these step-by-step instructions:
Paper cutter
Scor-Pal Scor-Tape
Snowflake Stamps
Versa-Craft white ink pad/embossing powder
Heat gun
4" of cord/string
Navy Blue Cardstock
1) Cut your Cardstock to 3 1/2 x 8"
2) Using Scor-Pal and short side of cardstock at the top, score at 1/2" and 3"
3) Turn Paper 90 degrees and score at 1/2", 3", and 5 1/2".
4) Mark 1/2" from each scored (I used my scor-pal for this as well.)
5) Cut triangle off at each top corner (see diagrams) using the 1/2" marks and scored corner as your guide.
6) On the left cut a triangle using the 1/2" marks and scores (see diagrams.)
7) On right side cut a diagonal cut to the first score and straight down the score mark (see diagrams)
8) Score the piece diagonally across first square, diagonally the opposite way across the second square, and diagonally the opposite way across the last square (see diagrams.)
9) Use stamps/ink/embossing powder to add decorations and raised stamping to the piece. Avoid embossing on the glue tabs. (See diagram.)
10) Fold on score lines
11) Use scor-tape on each of the glue tabs and peel of backing.
12) Form a loop with cord/string and knot the end. Place the knot side in next to glue tab #1. Adhere tab 1 to the inside forming the side of the triangle.
13) If you wish fill with candy at this point and adhere the other 3 glue tabs to the inside of the box.
And here are the diagrams:
 With Brenda's instructions I bet you could whip one of these out in no time!
The next project also comes from Brenda.

 This is a take out box that Brenda dressed up! Isn't it cute? On the first side, Brenda used the Boss Kut Reindeer and on the other side she used the Boss Kut Tree. You can get these take out boxes at just about any store with a craft section. Add some ribbon for a handle, and brads to secure it and that's it! Brenda worked her magic with her white gel pen to give it added dimension. You could stuff some cookies or candy in one of these and you have an instant gift for a neighbor or co-worker.
Next I'd like to show you a cute Rudolph card from Jenn.
 Jenn used the Quickutz Deer and gave him a larger red nose. The sentiment was cut with the Silhouette with the Jingle portfolio. You still have time to get those Christmas cards in the mail and who wouldn't LOVE to receive this one?!
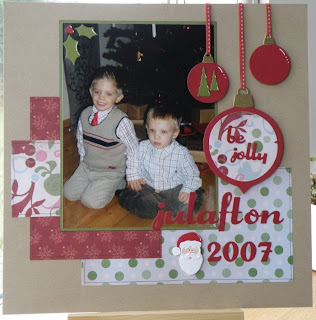
The last project for today is a layout from Veronica.
 For this layout, Veronica used the Quickutz Jolly gift set and the Quickutz Santa and Holly. What a great way to showcase those Christmas pictures!
Thank you DT for sharing all of your wonderful projects!
We'll be back on Friday with the fourth and final 12 Tags of Christmas post. The judging has begun and I can tell you it's not an easy task. Thanks to all of you who read the blog and also to those who partcipated in the 12 Tags of Christmas Contest. We hope you're enjoying all of the projects. See you Friday!
Katie


3 comments:
great projects! TFS!
Are we going to see all the entries that were submitted?
Mary they are going to show you all of the tag entries soon.
Post a Comment