Sunday, April 12, 2009

Happy Easter!

The Scrap-Mart family would like to wish you all a Happy Easter!

Veronica made this cute little card using the Quickutz 2x2 Chick and Egg die and the New Spring Chick. I know I've seen this chick and egg die a hundred times but it still cracks me up!

And just in case the Easter Bunny forgot to fill your basket, you can hop on over to Scrap-Mart and grab yourself some Easter goodies! Spellbinders Nestabilities are on sale for a whopping $14.99! There's some more great deals but act fast as they won't last forever!

We hope you have a wonderful holiday with your family! Thank you for your continued support! You are appreciated!

Katie

Friday, April 10, 2009

Happy Friday! So, do you have....

any plans for Easter? My family is lying low. We'll have dinner together and do the egg hunt, weather permitting that is. We're supposed to have thunderstorms most of the day. Whatever your plans are I hope you have a wonderful time!

Amanda Havon sent in this layout that was inspired by last week's sketch.

She used her Quickutz Jacqueline and Storybook alphabets for her title and she added a bit with the Scallop Border. I think her daughter's face says it all! Great layout, thanks for playing Amanda!

This week's layout sketch is another one of Veronica's!

Our card sketch this week comes from Page Maps.


Tammy created this layout insprired by Veronica's sketch.

Tammy used the Quickutz Rollerskate font and Boss Kut Totally Tall font for her title. She also used the Quickutz Revolution Photo Corner and the Unity Stamps Star of Worn background stamp. The photo is of one of Tammy's best friends practicing her best Hannah Montanna impersonation. Tammy is hoping her friend will still talk to her after this post! LOL!

Veronica created a cute card based on this week's card sketch.

She used the new Quickutz Bird, the Revolution Trees, and the Bead Border. Did you notice the background? Veronica used the Quickutz Cloud Border die to create her ground! How innovative!

Jenn also created a card from this week's sketch.

Jenn used the Quickutz 2x2 Cracked Egg Club Die, 2x2 Egg with Feet Die and the older 2x2 Chick die. The patterned papers and pinked circle are from Scenic Route's Lynden collection. I just love that cracked egg!

And here's my layout based on Veronica's sketch.

The title is a mix of the Quickutz Moonlight font and Making Memories Slice Wedding Design Card. The photo corners were cut using my Making Memories Noteworthy Design Card. I had some old big brads that didn't match my layout so I covered them with some American Crafts Zing Glitter Embossing Powder and heat embossed it so the glitter wouldn't flake off.

Thanks for stopping by today! We hope you've found some inspiration! We'll actually be back on Sunday with a special Easter post for you! If you participate in this week's sketch challenge, you can email your finished projects to Katie@scrap-mart.com. We'll see you soon!

Katie

Wednesday, April 8, 2009

The best thing about my job...

is sharing! Projects, stories, inspiration. It's all about the sharing! Today I'm happy to share projects from three of our readers, Shar ,Bimpe and PJ. All three ladies sent me some wonderful projects! We'll start with Shar's...

Shar used the Quickutz Honeybee Classic alpha and the Olivia Skinny mini for her title. She also used the Quickutz Club Revolution Butterfly, the Bead Border and the Revolution Nameplate. Honeybee is one of my favorite new alphabets! And don't you just LOVE those lashes?! I wish I had lashes that long!

Our next guest, Bimpe, isn't even a scrapbooker. She had a project to do for school so she enlisted a friend to help. This is what she came up with...

For her page title, she used a combination of the Quickutz Rockstar and Spotlight fonts. She also used the Making Memories Slice along with the Basic Shapes 1 design card (for the circles of the tree) and the Fall/Back to School design card (for the tree base and red bird). She also added a border from a piece of Sassafras Lass patterned paper for some color on the edge of her layout. Bimpe, be sure to let us know what your professor thinks and what you end up with for a grade!

PJ sent me this way cute card.....wanna play?

Isn't this card cute?! PJ used her Making Memories Slice and her Just Chillin' Design Card. This card would be perfect for any kid...or anyone who has a little bit of kid still within them!

Tammy is working on her Easter preparations. Here's a great little card she has ready to mail...

Tammy, like the rest of us, has a busy life! She used the Revolution Rabbit and the Scallop Border and with just a little bling, she was done! A quick, cute card to brighten someone's day!

Thanks to our guests for joining us today and for sharing all of your projects with us! If any of you would like to share your projects with us you can email them to me at Katie@scrap-mart.com. We'll be back Friday with your layouts from last week's sketch and an all new sketch for this week! Take care and we'll see you soon!

Katie

Monday, April 6, 2009

Whew! What a weekend!

My son, Seth, turned 9 on Friday and my weekend was packed with birthday celebrations! From movies, to a skating party to a family celebration. I'm exhausted! How 'bout you? What did you do this weekend?

Well, Jenn spent the weekend at the Creating Keepsakes Convention in St. Louis. She had tons of fun in the booth with the Making Memories Slice. If you have any pictures from CKC St. Louis we'd love to see them! You can email them to me at Katie@scrap-mart.com.

Our friend, PJ, sent me this great card...

She used some American Crafts Patchwork Accents for all the images on the card. Here's PJ's directions to recreate this card:

Cut blue background to 5 ¼" x 7"
Cut purple paper to 5" x 6 ¼" and layer paper
Cut 1 white box to 1 7/8" x 6 1/8"
Cut 2 white boxes 3" x 2 7/8" and stack one on top of the other as shown
Decorate your boxes using the Patchwork Accents stickers from American crafts
Stitch with a black pen around each white box

There are numerous options for sentiments for this card! You could say...
You are "SEW" Special!!
Thank you "SEW" much!
"SEW," how've you been?
"Sew," what's new?
"Sew," what's up?
It's been "sew" long since we talked…call me!
You are "SEW" sweet…thank you "SEW" much!
"SEW," I heard it’s your birthday….

Don't you love how she added real material to the card?! What a great touch! And those American Crafts Accents are so versatile!

Veronica has a chocolate lover in her house. Check out the photo on this layout...

The title, which translates to "a true chocoholic", was made with the Marigold alphabet. Doesn't that photo crack you up? Veronica and her family were headed out to a New Year's Eve party and she had already given Melker a bath. Her husband was supposed to get him dressed while Veronica showered but obviously, Melker had other plans! LOL! This is what memories are made of!

Tammy has her very own Easter Bunny! Okay, you got me. She doesn't have a REAL bunny but Lauren is waaaaay cuter that a bunny!

Tammy used the Quickutz limited edition Jolly font for her title which totally proves it's not just for holiday projects! For her journaling, she used the Unity Stamp Every Day Use...which is perfect for scrapbook layouts! Check out her ribbon flowers! Tammy got this idea from Chrissy, a member of Transparent Touches and Tags design team.

I spent some time playing...I mean practicing (wink)...with my Copics this weekend. I used the airbrush system to create this card.

The papers are Sassafras Lass. I cut the Revolution Bird in acetate and I used my Blue Green Copic in the airbrush system to color the it. I had some leftover pieces of the Revolution Label that I had used on another project so I cut it in half and mounted the bird on top of it. I stamped my entiment on a tag from the Spellbinders Double End Tags and I cut one end off so it would stop at the edge of the card like the label.

Thank's for stoppin' by today! I have another video for you on Wednesday so be sure to check back! While you're here leave us a comment and let us know what you did over the weekend and if you have any burning questions, leave them too! Take care and we'll see you Wednesday!

Katie

Friday, April 3, 2009

Glitter, glitter everywhere!

That is unless you're using the all new American Crafts Zing Glitter Embossing Powder! Our friend, Lainey, asked us if we could give a glitter review. Here's what I know about working with glitter. We all love to add a little bling to our projects but let's face it, no one likes the mess. There are a number of ways to add that glittery look. You could use glue and glitter, Stickles glitter glue, or an embossed glitter. Here's my breakdown on the pros and cons of each.

Regular Glitter: Pros: You can purchase them in the crafts section in multi-packs for a small amount of money. They are available in a large variety of colors as well as grains. You can easliy cover a large area using this type of glitter. Cons: It is messy! This type of glitter also tends to flake off over time.

Stickles: They are relatively inexpensive and come in a variety of colors. The bottles are small and easy to store and a little goes a long way. You can apply them in a thin, transparent layer or you can use them to outline and leave a 3-d look. Cons: You have to wait for them to dry and if you have used alot, it can take a while.

American Crafts Zing Embossing Powders: This glitter is a regular embossing powder and the heat setting keeps it from flaking off later. You get more bang for your buck with these too. They leave a smooth finish and you still get the shimmery glitter look! Cons: They can be messy just like regular glitter. The colors are limited...right now!

Well, that's what I know about glitter! If any of our readers would like to add anything, we'd love to hear it! You can leave a comment or email me at Katie@scrap-mart.com.

Now, let's see some projects! We'll start with projects from our readers based on last week's sketch. First up is Shar...

Shar used a variety of Quickutz dies on her layout. To create her title, she used the Blossom Mini and the Diesel Classic Shadow. She also used the new Nesting Stars from March's release, the Washington State die, and the fishing pole. The bracket was cut with her Silhouette. Look at the closeup...

Shar used REAL fishing line for her pole! The fish her husband is holding in the picture is a 12 pound Blackmouth Salmon that her son caught! It won him a $200 prize! How awesome is that?!

Our friend Carrie took the sketch to a whole other level by turning it into a two page layout!

Carrie used the Quickutz Patterned Brackets and Arrows as well as the retired Fiesta alphabet. Here's a closer look at the individual pages...

Carie added lots of detail by filling the holes of the patterns with different colored brads! How creative!

And here's Amanda Havon's take on the sketch...

Such a pretty layout!

Thank you, friends, for participating in the sketch challenges! We enjoy seeing your interpretations! Now, let's take a look at this week's sketch which comes from Veronica.

I really like the layers! Here's Veronica's take on her own sketch...

Her title reads "Viggo loves to go down the slide!". She cut the title using the Marigold font with fun foam! Veronica also used the Scallop Border and the Revolution Tree. Here's a closeup of the title and tree...
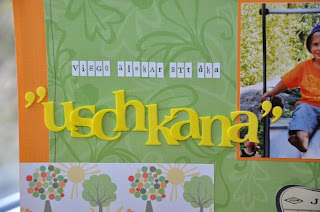
The fun foam adds lots of dimension to the title!

I really enjoyed this sketch! Here's my interpretation...

The papers and metal signs are from the Making Memories Just Chillin' collection and the title and stars were cut with the Just Chillin' Slice Design Card. Here's a closeup view of the title...


Thanks for stoppin' by today! We hope you have a great weekend! If you happen to be attending the St. Louis Creating Keepsakes Convention stop by the booth and say hi! We'd love to meet you! Email your completed projects to me at Katie@scrap-mart.com. We'll see you back here Monday!

Katie

Thursday, April 2, 2009

We're back today...

with Jenn's sample and video! Jenn created this cute card with the Sizzix Bigz XL Flower Card die.

And here's how she did it...


So, what do you think about the new Sizzix Express machine? I think it's a really great machine! Leave us a comment and let us know what you think. And while you're there, let us know what other videos you'd like to see! Thanks for stoppin' by! We'll see you tomorrow with our reader's takes on last week's sketch and an all new sketch!

Katie

Wednesday, April 1, 2009

It's "With us Wednesday" time again!

And this week, I'd like to welcome Diane, owner of Scrapbook Territory in Berkley, CA. Diane does wonders with Copic markers! Here are some of her cards...

For the first two cards, Diane used the Quickutz Revolution Dolls, Spellbinders Oval and Scallop Oval Nesabilities and her Copic markers(E21, E93, Y18, RV14 and R00). Look at the great detail added by using Copic markers! For her third card, Diane used the Quickutz Revolution Rainbow with Cloud and the oh-so-cute Rainbow 4x8 alphabet. Thank you Diane, for sharing your wonderful cards with us! If you're ever in the Berkley, CA area, stop in and say hi to Diane!

Veronica created this layout to document an art project her son made when he was younger.

The title, which means "Easter Decoration", was made with the Aquarius 4x8 alphabet. Veronica also used the 2x2 Chick and Scallop Border. Did you notice the brackets on the layout? Veronica created them with the Pearler Beads...you know, the ones you use your iron to melt together! How creative! Making a layout about a project is a great way to save it without ending up with an entire box of actual projects stuffed up in the attic!

Tammy has been in a cardmaking mood lately. Check out her latest Unity creation...

She used the Unity Stamps Birthday Chic set and her Spellbinders Classic Square Large and Classic Scallop Square Large Nestabilities. Cute card!

I too have been playing with my Unity stamps but I incorporated them into my scrapbooking.

For this layout, I used the Unity Stamps U & I wood mounted stamp. I first stamped it on the yellow paper for my base. Then I stamped it on the pink, cut it out and mounted it to the yellow base with dimensional adhesive. I stamped it again onto the green cardstock and cut out the 'u'. You can see how the paper-piecing adds so much detail. I cut the 'bffs' with my Making Memories Just Chillin' Slice Design Card created the border with my Fiskars Effervescence Border Punch.

I hope you enjoyed today's post! Thanks for stoppin' by! I have a special video post for tomorrow from Jenn so be sure to stop in for a spell. If you'd like to participate in "With us Wednesday" and share your projects, email them to me at Katie@scrap-mart.com. Have a great day and we'll see you tomorrow!

Katie